How to Create an Individual NPI

How to create an individual NPI
What is an NPI?
The National Provider Identifier (NPI) is a unique 10-digit identification number assigned to healthcare providers by the Centers for Medicare & Medicaid Services (CMS) in the United States. It's used for all standard transactions in the healthcare industry, including billing, claims processing, and sharing of healthcare information. Read more on NPIs here.
Here's how to create an individual NPI.
Individual NPI:
Step 1: Determine Eligibility
Individual practitioners who meet the definition of a healthcare provider can apply for an NPI. This includes physicians, nurses, therapists, and other individual healthcare professionals who provide medical services.
Step 2: Gather Required Information
Before you start the application process, make sure you have the necessary information handy to create an NPI.
This includes
Provider Name
SSN
Provider Date of Birth
Country of Birth
State of Birth (if Country of Birth is U.S.)
Provider Gender
Mailing Address
At least one Practice Location Address and Phone Number
At least one Taxonomy (Provider Type)1
State License Information2
At least one Contact Person Name
At least one Contact Person Phone Number and Email
Step 3: Access the NPI Enumerator Website
Visit the National Plan and Provider Enumeration System (NPPES) website at https://nppes.cms.hhs.gov/ to begin your NPI application. To further understand the sites, read more here.
Step 4: Fill Out the Application
A. Once you're in the website you'll click Apply for an NPI for myself.

B. Here you'll fill out your provider profile. Make sure to enter your legal name, no nicknames or Jon instead of Jonathan. Make sure to enter any previous name you might have used.
There is a bar at the top of the application so you can track your progress as you complete the sections.

C. Finish entering in your demographics. It's good to enter any languages you speak. Insurance companies and patients will see this information and you'll be able to reach a wider audience with multiple languages.

D. Next, you'll enter in your mailing address and practice location. You can have more then one practice location but only one mailing address. If you are telehealth, enter your home address or the address you provide telehealth services from.

E. This section is optional and usually skipped. Endpoints offer a straightforward, secure method. They allow users to transmit authenticated and encrypted health data directly to trusted recipients.
To enter your Endpoint information, the following fields are mandatory:
Endpoint Type
Endpoint
Endpoint Location
Is the Endpoint affiliated to another organization?
Affiliation Legal Business Name (LBN) when Endpoint is affiliated to another organization.

F. This section is also optional and usually skipped. You may enter Legacy Numbers, Medicaid numbers, and other state Identifiers if you have them.
Do not enter the following into this section.
SSN
Tax ID
DEA
Medicare PTANS/IDs

G. This is where you will enter the contact information. It's best to enter the provider that is applying for the NPI. Select the radio button that indicates Contact Person is same as Provider. Selecting the radio button will populate the Contact Person Name with the Individual Provider’s name entered on the Provider Profile page.
You'll see the following information.
Name: Make sure it's the legal name, no nicknames
Credential(s): (M.D, D.O, etc.)
Title/ Position: Provider, Authorized Official, etc.
Telephone Number and Extension:
Contact Person's Email:

H. Next, you will enter your taxonomy. A taxonomy is basically your job description. Not to be confused with your specialty but for an individual, they will be the same thing. If you are a Nurse practitioner, your taxonomy will be 363L00000X Nurse Practitioner . For more information about choosing a taxonomy, click here. For the complete list of taxonomies, visit NUCC's site here.

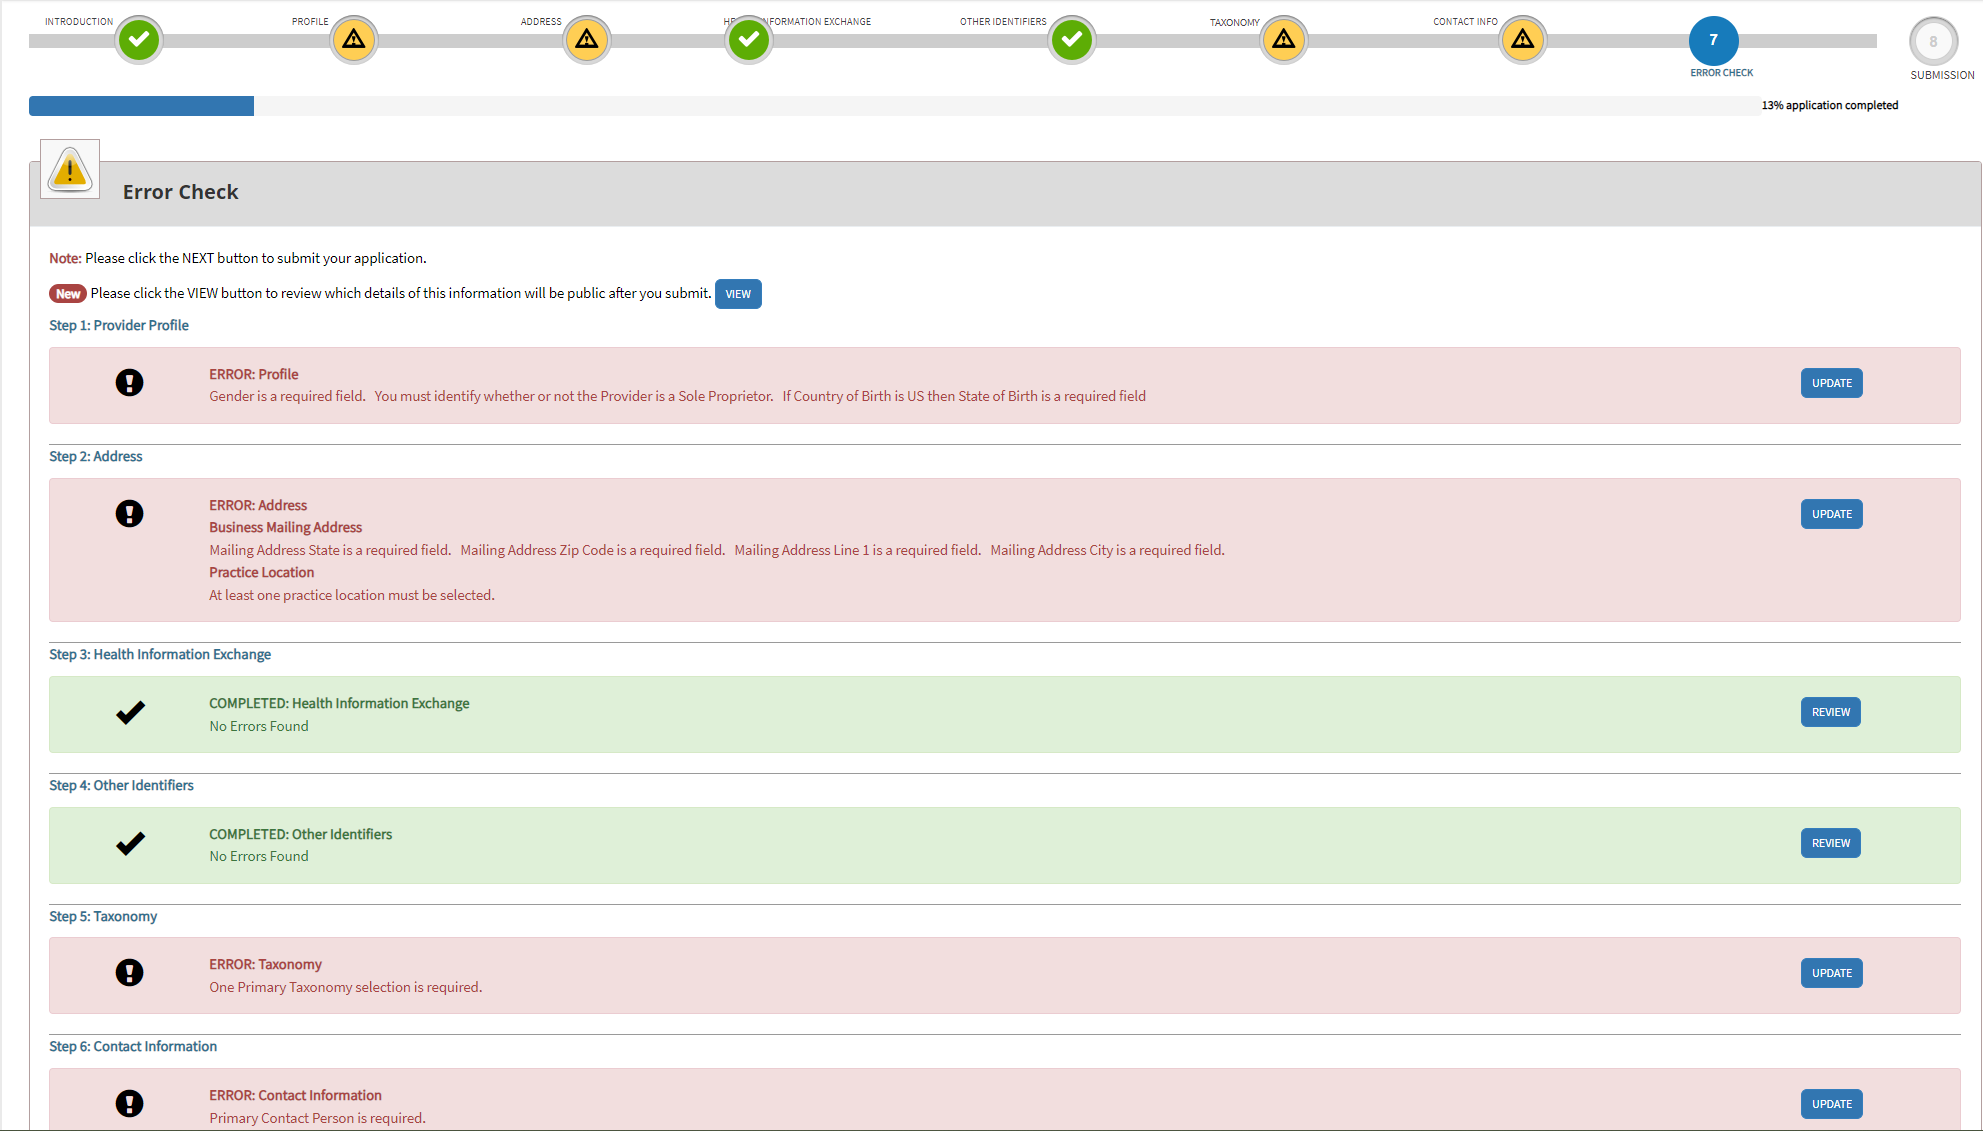
I. At the end you can review any errors. The errors will be in red so you know which section to check and correct. When all sections are green, you will be able to submit the application.
Step 5: Submit the application
Once you confirm the information is accurate and correct, you can submit the application. You'll receive a confirmation page with a tracking number. NPI's are usually approved anywhere from immediately to 48 hours.
Congrats! You submitted your NPI application! Keep an eye on your email for approval or check the site to see when it's approved. You'll see a confirmation date and your new NPI number.
If you need any clarification on how to fill out this application, please schedule a free consultation today!


